Previous tutorial: Azure Functions – Part 6: HTTP and Timer Triggers
Continuing with theme of the previous tutorials, let’s investigate data triggers work. There are three possibilities: Blob, Queue, and Cosmos DB (maybe there are more but these are a good starting point). For some reason Azure Tables are not supported, and there is an open issue for this support since 2015, so I don’t think it’s coming soon :-).
For this tutorial I created a new Azure Functions project and three functions based on the templates provided by the VSCode Azure Functions extensions, which is a good place to start the investigation. For this tutorial you’ll need the Azure Storage Emulator up and running, and the Azure Storage Explorer open so you can make changes that trigger the functions. You also need to have an Azure Cosmos DB Emulator installed and running – you can download it from here and follow the installation instructions.
The first thing that we need to define are the connections to the storage that we are going to use. I’ll use the Storage Explorer to get these settings. This is what I see when I open it:

And clicking the “Emulator” node shows the connection string at the bottom of the screen, like this:

I’ll also add my Cosmos DB emulator instance to the explorer by right-clicking on the “Cosmos DB Accounts” node and selecting “Connect to Cosmos DB Emulator”. But I don’t see how I can get the connection string from here… Seems that’s not the way. So to get the connection string to the Cosmos DB, I’ll right-click on the “Azure Cosmos DB Emulator” on my notification area (and sorry non-windows readers, you’ll have to figure this out by yourselves)

select “Open Data Explorer”, which brings up a website where I can see the settings that I need:

With these connection strings at hand, I’ll add two new settings to the local.settings.json file, and update the value for the AzureWebJobsStorage setting to be the same as the storage account I’m using, for reasons explained later. This is the complete file:
This file contains bidirectional Unicode text that may be interpreted or compiled differently than what appears below. To review, open the file in an editor that reveals hidden Unicode characters.
Learn more about bidirectional Unicode characters
| { | |
| "IsEncrypted": false, | |
| "Values": { | |
| "AzureWebJobsStorage": "AccountName=devstoreaccount1;AccountKey=Eby8vdM02xNOcqFlqUwJPLlmEtlCDXJ1OUzFT50uSRZ6IFsuFq2UVErCz4I6tq/K1SZFPTOtr/KBHBeksoGMGw==;DefaultEndpointsProtocol=http;BlobEndpoint=http://127.0.0.1:10000/devstoreaccount1;QueueEndpoint=http://127.0.0.1:10001/devstoreaccount1;TableEndpoint=http://127.0.0.1:10002/devstoreaccount1;", | |
| "FUNCTIONS_WORKER_RUNTIME": "dotnet", | |
| "MyStorage": "AccountName=devstoreaccount1;AccountKey=Eby8vdM02xNOcqFlqUwJPLlmEtlCDXJ1OUzFT50uSRZ6IFsuFq2UVErCz4I6tq/K1SZFPTOtr/KBHBeksoGMGw==;DefaultEndpointsProtocol=http;BlobEndpoint=http://127.0.0.1:10000/devstoreaccount1;QueueEndpoint=http://127.0.0.1:10001/devstoreaccount1;TableEndpoint=http://127.0.0.1:10002/devstoreaccount1;", | |
| "MyCosmosDB": "AccountEndpoint=https://localhost:8081/;AccountKey=C2y6yDjf5/R+ob0N8A7Cgv30VRDJIWEHLM+4QDU5DE2nQ9nDuVTqobD4b8mGGyPMbIZnqyMsEcaGQy67XIw/Jw==" | |
| } | |
| } |
We’re finally ready. Let’s start with Blob trigger. This is the function created by the wizard, with some changes to match my environment:
This file contains bidirectional Unicode text that may be interpreted or compiled differently than what appears below. To review, open the file in an editor that reveals hidden Unicode characters.
Learn more about bidirectional Unicode characters
| using System.IO; | |
| using Microsoft.Azure.WebJobs; | |
| using Microsoft.Azure.WebJobs.Host; | |
| using Microsoft.Extensions.Logging; | |
| namespace Vainolo.AzureFunctionsTutorial.Part7 | |
| { | |
| public static class BlobTriggerCSharp | |
| { | |
| [FunctionName("BlobTriggerCSharp")] | |
| public static void Run([BlobTrigger("myblobs/{name}", Connection = "MyStorage")]Stream myBlob, string name, ILogger log) | |
| { | |
| log.LogInformation($"C# Blob trigger function Processed blob\n Name:{name} \n Size: {myBlob.Length} Bytes"); | |
| } | |
| } | |
| } |
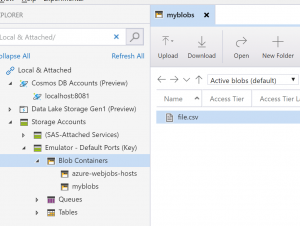
The Function defines a trigger that looks for changes in a Blob container named “myblob” and triggers when it finds a change in the container (new or updated). Let’s hit F5 to run the Function. I’ll go to the Storage Explorer, create a new Blob container named “myblobs” and upload a file to the container:
After doing this, I get an update in the terminal showing the detected change:

Let’s see what happens when we upload a folder to the Blob. I created a folder that has two files and uploaded it to the blob. The log shows that each one of the files added triggers the function:

But what happens if the function is not working and there are changes to the blobl? Well, that’s what we are here for, to investigate :-). Let’s stop the Function with Shift-F5, add a couple of files to the Blob, and start the function again. The function detects the changes and each changes triggers it.
Let’s move on to Queues. Using the Functions wizard I created a function that uses a Queue trigger. Here’s the result with some small changes to match my environment:
This file contains bidirectional Unicode text that may be interpreted or compiled differently than what appears below. To review, open the file in an editor that reveals hidden Unicode characters.
Learn more about bidirectional Unicode characters
| using System; | |
| using Microsoft.Azure.WebJobs; | |
| using Microsoft.Azure.WebJobs.Host; | |
| using Microsoft.Extensions.Logging; | |
| namespace Vainolo.AzureFunctionsTutorial.Part7 | |
| { | |
| public static class QueueTriggerCSharp | |
| { | |
| [FunctionName("QueueTriggerCSharp")] | |
| public static void Run([QueueTrigger("myqueue", Connection = "MyStorage")]string myQueueItem, ILogger log) | |
| { | |
| log.LogInformation($"C# Queue trigger function processed: {myQueueItem}"); | |
| } | |
| } | |
| } |
The trigger for this function is adding new message to myqueue. Let’s try this out by running the function and adding a message to the queue:

If you are following the tutorial with me, you’ll see an exception being thrown by the runtime. A JSON parsing error throws this exception because the runtime tries to parse the message as a JSON object, and it fails (something that will probably be fixed in the next major runtime version, according to this pull request). So ignore the exception and the message added to the queue appears in the terminal:

Messages processed by the function are removed from the queue after being processed, and if there are messages added to the queue when the function is not running, when the function starts each one of these messages triggers the function. It’s important to note that these message processing is done in parallel – the runtime will process up to 24 messages in parallel on each machine that hosts the function (based on this documentation). So don’t assume any serial order on messages received. There are other interesting things to know about how queue polling works and what happens when a message can’t be processed.
On to Cosmos DB, the (relatively) new and shiny storage in Azure. Unlike Table, Blob, and Queues, we need to create the Cosmos DB database and collections before we run the function for the first time, so let’s get to that. A Cosmos DB trigger requires two collections: one that monitored for data changes, and another one for leases. And what are leases? They are the way the function stores which changes it has processed in the database for when the function is not up when the changes happen, it will know from which change point to start (at least that is what I understand from the documentation and multiple articles I read). So let’s create these using the Storage Explorer, which ends up looking like this:

Creating each item is very simple and done through right-clicks on each node so I’m not going to show the exact steps… I trust you can figure it out.
Now let’s see what the code looks like:
This file contains bidirectional Unicode text that may be interpreted or compiled differently than what appears below. To review, open the file in an editor that reveals hidden Unicode characters.
Learn more about bidirectional Unicode characters
| using System.Collections.Generic; | |
| using Microsoft.Azure.Documents; | |
| using Microsoft.Azure.WebJobs; | |
| using Microsoft.Azure.WebJobs.Host; | |
| using Microsoft.Extensions.Logging; | |
| namespace Company.Function | |
| { | |
| public static class CosmosDBTriggerCSharp | |
| { | |
| [FunctionName("CosmosDBTriggerCSharp")] | |
| public static void Run( | |
| [CosmosDBTrigger( | |
| databaseName: "mydatabase", | |
| collectionName: "mycollection", | |
| ConnectionStringSetting = "MyCosmosDB")]IReadOnlyList<Document> input, | |
| ILogger log) | |
| { | |
| if (input != null && input.Count > 0) | |
| { | |
| log.LogInformation("Documents modified " + input.Count); | |
| log.LogInformation("First document text " + input[0].GetPropertyValue<string>("text")); | |
| } | |
| } | |
| } | |
| } |
Here the function triggers when a new “Document” is added to the mycollection collection in database mydatabase. If the name of the leases collection is not set, it defaults to “leases”, which we already created. Let’s hit F5 and make sure that the function is up and running, then go to the Storage Explorer and add a new document:
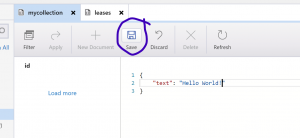
And like magic, after saving the document, the function triggers and the terminal shows our message:

We now know how to use a couple of triggers based on data. In the next tutorial we’ll investigate how some of the Function bindings work, in preparation for our first “real” application using Azure Functions. Until then, happy coding!